Global Map field guide
How to read the Craterra Global Map
The Global Map is the quickest way to understand where you are on the Moon and what is happening around that location. It combines the complete lunar surface with live illumination, availability zones, landmarks, plot status, and your current camera position.
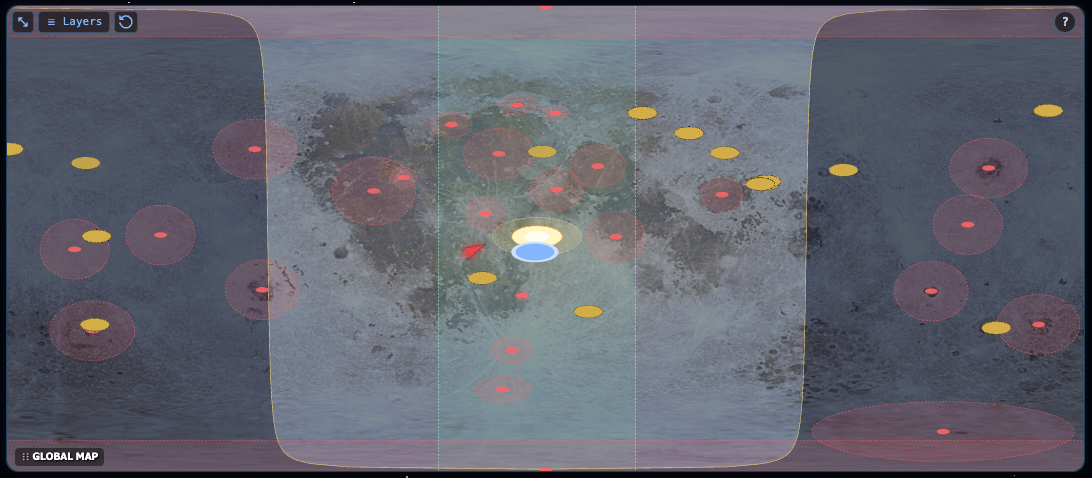
1. Start with the whole Moon
The Global Map uses an equirectangular projection. Longitude runs horizontally: the center corresponds to 0° longitude, while the left and right edges meet at the ±180° longitude seam. Latitude runs vertically from 90° N at the top, through the 0° lunar equator across the middle, to 90° S at the bottom.
The surface image is aligned with the same lunar coordinate convention used by the 3D terrain. Clicking or tapping a point on the map therefore moves the Explorer to the corresponding place on the Moon.
- Map center
- 0° latitude · 0° longitude
- Top / bottom
- 90° N north pole · 90° S south pole
- Left / right edge
- The same ±180° longitude seam
- Projection
- Equirectangular whole-Moon view
- Map action
- Click or tap to travel
2. Read daylight and the terminator
The lighter region is the sunlit hemisphere. The darker region is night. Their boundary is the thin yellow terminator line: places on that curve are at lunar sunrise or sunset, where the Sun is on the mathematical horizon.
The Sun marker identifies the subsolar point, where the Sun is highest in the lunar sky. As simulated lunar time changes, the daylight region, terminator, and Sun marker move together.
- Warm light area
- Lunar daytime
- Dark area
- Lunar night
- Yellow curve
- Sunrise / sunset terminator
- Sun marker
- Subsolar point
3. Do not confuse daylight with the solar zone
The green translucent band with dashed edges is the active solar zone used for plot availability. It is a product zone centered on the current subsolar longitude, not a second representation of the illuminated hemisphere.
The daylight layer follows simulated lunar time so you can study changing illumination. The active solar zone follows real UTC because it must match the availability rule enforced by Craterra. A place can be in daylight without being inside the green band.
- Green dashed band
- Active plot availability zone
- Configured half-width
- 1,000 km at the lunar equator
- Daylight clock
- Simulated lunar time
- Availability clock
- Real UTC
4. Recognize markers and restricted areas
The camera arrow marks your current location and points in the direction you are facing. The blue Earth marker shows the sub-Earth point: the location where Earth is highest in the lunar sky.
Gold dots represent purchased plots, green or teal dots represent reserved plots, and orange dots represent pending records. Red dashed ellipses mark active restricted areas around landmarks; their apparent oval shape comes from drawing a circular lunar area on the flat map projection. These areas open gradually. Opening dates may change from week to week, so follow Craterra announcements and check the map for current availability.
- Camera arrow
- Your position and facing direction
- Blue Earth marker
- Sub-Earth point
- Gold / green / orange dots
- Purchased, reserved, or pending plots
- Red dashed ellipse
- Active landmark restricted area
5. Use layers to answer one question at a time
Open Layers to show or hide the terminator, solar zone, landmark rings, and plot overlay. Turning off unrelated layers makes it easier to compare terrain, locate an available longitude, or inspect your plots.
On mobile, open Map from the command bar, choose layers, then tap a location to travel there.
6. Move, resize, and reset the desktop map
To move the panel, drag the “⋮⋮ GLOBAL MAP” label along its lower-left edge. The panel follows the pointer and remains inside the browser window.
To resize it, drag the small blue square in the upper-left corner. Pull it up and left to make the map larger, or down and right to make it smaller. Width and height change together, so the whole-Moon projection keeps its proportions.
After the size changes, a “⟲” reset button appears beside Layers. Select it to restore the standard map dimensions. Moving the panel and resetting its size are separate actions: reset changes the dimensions, not the chosen screen position.
- Move
- Drag the ⋮⋮ GLOBAL MAP label
- Make larger
- Drag the blue corner up and left
- Make smaller
- Drag the blue corner down and right
- Reset dimensions
- Select ⟲ beside Layers
A practical reading order
First find the camera arrow. Next check whether the location is in daylight or night. Then compare it with the green availability band and any red landmark ring. Finally use plot markers, the compass, scale ruler, and coordinate display to understand the exact context before travelling or selecting.